TelLog V 1.1 – Marcantonio EL
TelLog V1.1
Functions and characteristics of the TelLog
I. What is it and what is it for
III. Dialing numbers control and filter
IV. Called numbers and calling user log
V. Customizable PIN for each user
VI. Administrator for PINs and users control
VII. Separate lists of numbers each user can dial
VIII. Common list of numbers each user can dial
IX. List of numbers that everyone can dial without authentication
X. Up to 4Mb of memory to data storage
How to install the TelLog on the telephone line
I. How to connect to the line and to the phones
II. How to install on traditional line
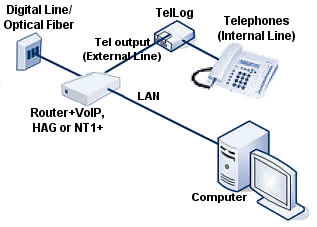
III. How to install on lines derived from xDSL, ISDN, VoIP or optical fiber
IV. How to install on xDSL if you have a filter for each phone
V. Spies and messages from the TelLog
Control and configuration software
I. How to set up the software.
II. Start up and parameters settings.
III. How to insert the Prefixes and Preselection Codes Tables.
I.What is it and what is it for
The TelLog, connected to the telephone line, can do in absolute autonomy some different and very useful things.
Phone line access control:
Only authenticated users can dial some numbers considered not free.
There is an adjunctive list of (kind of) numbers everyone can dial without authentication, the free numbers list.
Each user is recognized by a numeric identifier (1..n) plus a customizable PIN.
Dialing numbers control and filter:
The administrator will set, for each user, a list of kind of numbers he can dial: each user will be able to dial only the kind of numbers which is authorized to dial.
As said, there is an adjunctive list of kind of numbers everyone can dial without authentication, which will contain the kinds of numbers for which we are not interested in log and filtering (i.e. Free numbers, local numbers, etc).
Called numbers and calling user log:
When an user dial a number by authenticating himself, the TelLog logs when that number was dialed and who dialed it.
The Administrator will then be able to transfer the log on the PC for further uses and elaborations.
The TelLog's memory is oversized for a typical continuous use of two months in a medium office.
Main function of the TelLog is to control the phone line uses: only an authenticated user can dial numbers that are not free.
The TelLog controls both DTMF and decadic dialing of a number, but it doesn't control the use of the line: everyone will be able, for example, to pick-up a phone to answer to an incoming call, and he will be connected to the line until he doesn't attempt to dial something.
To dial a non free phone number the user will have to authenticate himself by dialing:
#<UserID><PIN>*
Where
<UserID>: Numeric identifier of that user (1 or 2 digits, depending by the model)
<PIN>: Secret Password of that user (customizable by the user)
Then he can regularly dial the number he wants to dial.
If the UserID and PIN pair is incorrect, the user will not be able to dial and he will hear an acoustic signal in the phone.
III.Dialing numbers control and filter
With the TelLog you can control and filter the numbers that can be dialed.
For each user there is a fully customizable list of kind of numbers that user can dial.
These lists can contain whole numbers and/or their first digits (a kind of prefix),
Each attempt to dial something not in a list will generate a disconnection from the phone line and an acoustic signal in the phone.
In this way there is a real-time identification of unauthorized numbers, to avoid the start-up cost of the call, which can be very expensive in some cases, like in Dialer viruses, which uses fake satellite phone numbers.
The control of the dialing number can be very useful i.e. to avoid some child to dial some expensive phone services or to dial too many cellular phones numbers.
Using the user's lists the parents can enable them to dial some cellular phones numbers but not all.
The parent can then enable himself to dial each kind of number, but his son will be able to dial only what he have been authorized to!
This is a very good protection against expensive services, like hot lines, chat lines, etc.
This can protect against dialer viruses too, which can re-configure your modem connection to dial a very expensive number.
IV.Called numbers and calling user log
Another very important function of the TelLog, from which its name, is to memorize (to log) each call's datas, including the called number, the time and date of the call and who made that call. In this way you will be able, by a comparison with the phone bill details, to know how much each user spent.
For each call made by authenticating the user, the TelLog will memorize:
Call Date;
Call time;
Dialing user (who made that call);
Dialed Number, including preselection codes (up to max 20 digits).
The TelLog will store the record even if there is no answer, to avoid some attempts to circumvent the TelLog in using a free line tone emulator device.
The record doesn't contain what you dial after 16" by the last digit, to exclude automatic response services selections.
V.Customizable PIN for each user
Each user can customize his PIN at each time, by simply typing, on the phone:
#<UserID><OldPIN>#<NewPIN>#< NewPIN >#
<UserID>: Numeric identifier of that user (1 or 2 digits, depending by the model)
<PassUtente>: Actual PIN;
<NuovaPass>: New PIN have to be inserted twice, for safety reasons;
The PIN can be 1 to 7 digits length.
An high tone will notify the PIN have been correctly updated; 4 high and low tones will notify an error while changing the PIN.
An user who lost his PIN will not be able to authenticate himself, both to phone and to change the PIN.
In this case the Administrator will have to reset that user's PIN, then the user will have to re-customize the PIN.
VI.Administrator for PINs and users control
The user “0” is the system administrator.
His password can be modified as other user's ones, but the administrator can't dial any number.
Contrariwise, if you digit the usual dialing sequence, specifying “0” as the UserID, like:
#<AdministratorID><AdministratorPIN>*
you'll access to a maintenance command set.
After the * you can digit:
1<UserID>
to enable the user specified by UserID and set his PIN to the default value of “000”
2<UserID>
To completely disable the user specified by UserID
3<UserID><NewPIN>#< NewPIN >#
To manually set the UserID's PIN to the NewPIN value
If the Administrator modifies or assigns a PIN for a disabled UserID, that user will be enabled.
The specified UserID can be the Administrator himself.
If the Administrator have been disabled, or his PIN have been lost, this can be restored by the emergency procedure:
Turn the TelLog off by unplugging the power supply;
wait 30";
keep pressed the emergency button on the bottom (or on the inside) of the TelLog;
while keeping the button pressed, re power up the TelLog and wait 10";
release the emergency button.
Now the Administrator's PIN have been restored to the default value of “0000”.
This will not affect other user's passwords or stored logs.
VII.Separate lists of numbers each user can dial
There is a separate list of authorized numbers and preselection codes.
Consider that:
If you enable a “prefix” for an user, you enable him to dial any number starting with that digits; for example, if you insert “07” in a list, that user will be able to dial any number starting with “07”, even if that is not a real geographic prefix and doesn't identify a city;
From now we will talk about a prefix as first ciphers of a valid number which is in the prefixes list, not as a real area code;
There is a main difference by a prefix and a preselection code: if you digit a valid prefix, everything that follows it is considered valid; if you digit a valid preselection code, it will be ignored and the check will restart from what follows it, as if you was starting to dial from what's after that preselection code;
You can type more than one preselection code before the number, the check will even restart after each preselection code;
You can insert a whole telephone number as a prefix, even remembering the prefix's max length of 15 digits. For example it can be useful to make a child able to call his parents on mobile phones, but not to make him able to call each mobile phone (which are expensive). Or you can enable a secretary to call your and your only mobile phone;
If you insert two or more prefixes/preselection codes which are equal or one the beginning of the other, the system will consider what it recognizes first. If you insert “3”, this will overlap each attempt to insert something starting with 3 (so “33”, “321”, etc will be ignored).
The control order is:
Public Prefixes
Public Preselection codes
Private Prefixes
Private Preselection codes
So, if you insert “06” as a public preselection code, and as a private prefix, it will be considered a preselection code (and it will be ignored);
Each prefix/preselection code max length is up to 15 digits;
Each code uses a memory space of his length+1;
For each user you can't enter more than 64 prefixes plus 64 preselection codes;
For each user there are 512 memory locations for prefixes and 512 for preselection codes (512Bytes, each ones containing both information for prefixes and preselection codes, so the limit to 15 digits each).
Each user is assigned a prefixes table and a preselection codes table. If that user attempts to dial something not starting with a valid prefix, the line will be disconnected, cause that user is not allowed to dial that kind of number.
For example, to enable an user to call any number in your area, insert in his table the relative area code.
Preselection codes does not modify the list, but they represent something that can be added before the phone number, like phone central commands.
Depending on the Country you are using the TelLog, they can be:
*67# In some Countries it can be pre-added to a number to make an anonymous call;
10xx To make a call using a particular phone operator.
If the TelLog recognizes a valid preselection code by the relative table, it simply ignores it, and the control will restart after that code, as if the user was starting to dial after the preselection code.
VIII.Common list of numbers each user can dial
As said, there is a public list too (for public prefixes and public preselection codes).
This has the same use of the private ones, but its contents apply to each authenticated user.
It's intended to avoid the insertion of some values on each list, by simply adding a value you want to be valid for each user in this list.
If you insert a prefix in the Public Prefixes list, each authenticated user can call a number starting with that prefix.
The same is valid for Preselection Codes Public list.
Remember that the TelLog checks the Public lists before the private ones.
IX.List of numbers that everyone can dial without authentication
To avoid to authenticate oneself even if you have to dial a “free” number too, there is an adjunctive couple of lists.
It's useful for those numbers that can be considered “free” (free of charge or free to be dialed), or for which is not useful to log each call.
Everyone can dial a number starting with a prefix contained in the Free List without autentication.
If, for example, you want to use the TelLog to determine who made a call (and so who have to pay for it), and if you doesn't pay for local calls, is not useful to insert the local area code in another list, but you can insert it in the Free List. In this way everyone can call any number starting with the local area code without authentication (as if the TelLog wasn't installed), and the call's datas will not be logged.
Note: for privacy reasons, and to avoid to fill the TelLog's memory with useless data, no log will be added for a free call!
If a call is free only via an operator, and there is a specific preselection code for that operator, you have to insert it as a part of the Prefix Free List, not in the Preselection Codes Free List.
For example, if you can make free calls to numbers starting with xyz with an operator which preselection code is abcd, you have to insert abcdxyz in the Free Prefix List, and not to insert abcd in the Free Preselection Codes List.
If you insert abcd in the Free Preselection Codes List, and xyz in the Free Prefix List, dialing abcd it will be ignored, but everyone will be able to dial a number starting with xyz even without pre-dial abcd, so the call will be not free!
Very important: this list must even contain “11” to allow emergency calls (“112”, “113”, “115”, etc).
It must contain “911” in Usa or other local emergency call number.
It will be very dangerous for things and people to omit that number in the Free Prefix List!
X.Up to 4Mb of memory to data storage
The TelLog can log from 3040 to 32480 calls, depending on the model and the installed memory.
The 8 users version of the TelLog 1.1, with 1Mbit, can log 7904 calls, that means more than 180 calls a day, for five days a week for two months, or 131 calls a day for 60 days!
This is an oversized capacity for a medium office.
The TelLog can mount up to 4Mb of memory, to log 32480 calls.
The TelLog's memory is an advanced EEPROM: it can retain data and settings up to 120 years without power and can be written at least one million of times, against the cheaper Flash which can be written about thousand times and stores data to at most few years.
To guarantee the maximum product quality, and your data preservation, the last generation of EEPROMs from the Arizona Microchip® have been chosen.
|
ATTENTION!
To make the TelLog more sabotage resistant, it disconnects the external line from the internal line when it is not powered, making impossible to call if maliciously unpowered. It is highly recommended to dispose an alternative way to contact emergency services when needed, like an emergency phone. A better, simpler and more effective way is to use a small UPS (Uninterruptable Power Supply) to power both the TelLog and the Router (they will be probably installed closer) to be able to phone and access the net even during black-outs.
|
Note: before using the TelLog you have to program it with valid parameters using its software.
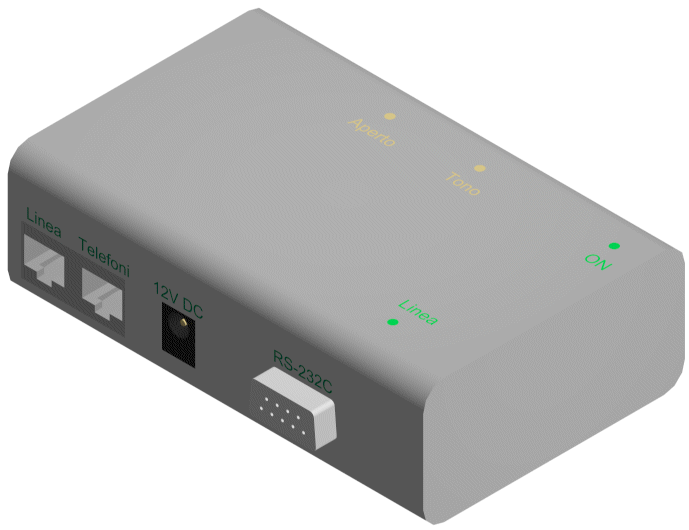
On the front face of the TelLog there are two female phone plugs (RJ11).
The external one is the input and it has to be connected to the phone line (external line); the internal one is the output, and it has to be connected to the existing telephonic line of the home/office (internal line).
You can simply connect a phone to the output, if you have just one.
You then have to power the TelLog using its wall cube power supply.
You do not have to have a PC permanently connected to the TelLog and running to have it working.
|
ATTENTION!
Never connect the phone line cable to the to the internal line connector on the TelLog! This can result in a permanent damage on the TelLog. You can't miss: Internal Connector = Internal Line, External Connector = External Line!
|
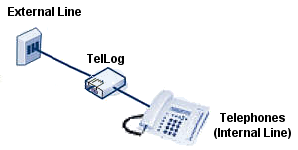
If you have a common phone line (PSTN), and you don't have any xDSL working on the same twisted pair, you do not need anything else to have the TelLog working.
You have to connect the TelLog at the beginning of the Phone line: interrupt the phone line, connect it to the External Line connector of the TelLog and connect the existing internal phone line installation of the house/office to the Internal Line connector of the TelLog.
Remember: the TelLog needs to be powered to work, but doesn't need to be connected to a PC.
If your phone line derives from a device supplied by an internet provider/phone line provider, like:
Phone Line from an ISDN line (NT1+ analogic output);
Phone Line from a xDSL Modem analogic output (VoIP - Voice over IP - line);
Phone Line from the analogic output of an xDSL or optical fiber HAG.
Then you can install the TelLog simply considering that output as a normal analogic line.
Disconnect the output from your device, connect a cable from the device's output and the TelLog input (External Line) and reconnect the cable that was in your device's output to the TelLog's output (Phone or Internal Line).
If you have a Line with both phones and xDSL on the same twisted pair, as if to say you have a xDSL filter before each phone in your home/office, you have to use a xDSL Splitter before the TelLog.
Connect the line to the splitter's input, connect its xDSL output to the Modem/Router and its Phone output to the TelLog input; now connect the TelLog output to the internal phone line and remove the filters from the phones.
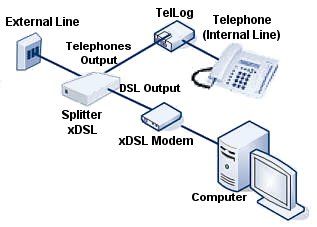
Using a good splitter instead of the various cheaper filters you will have a more stable and faster xDSL connection and you will highly reduce noise during calls, usually present with cheap xDSL filters.
If you have a single phone you can use a single xDSL filter, connecting its analogic output to the TelLog.
On your TelLog there are four spies.
Name |
Color |
Meaning |
|
ON |
Green |
The TelLog is powered and ON. |
|
Line |
Green |
If ON, the internal line (phones) is connected to the external line. If OFF it is managed by the TelLog and insulated by the external line (to identify an user, to execute a command, or because the user was not enabled to call that number). |
|
Hang-up |
Yellow |
A phone have been picked-up; flashes while pulse dialing. |
|
Tone |
Yellow |
A DTMF from a key on the phone have been recognized. |
More, there are some sounds The TelLog can generate and the user will hear directly in the phone:
One High note: Confirming signal for some commands;
4 alternate Hi-Lo notes: Error, wrong code or command or unauthorized phone number;
3 short, 3 long, 3 short (SOS): Memory full, please use the software to acquire data and clear the memory.
Insert the CD-Rom in your PC, it will autostart an HTML page.
If it doesn't start open My Computer, browse the disc and double click on index.html.
This will open your default browser showing a brief description of the TelLog's functions.
From the bottom of the page, click on Configuration Software and, when the Open/Save window will appear, click on Open It (depends on your browser).
If this doesn't work, browse your CD, go to the Soft subfolder and launch Setup.exe.
Follow the instructions and complete the setup.
To be configured the TelLog needs to be connected to a PC via a serial port capable to work at 115.200bps.
It is possible to use a Virtual Serial Port (connected via USB, Ethernet or Bluetooth) if its drivers have been correctly installed and configured and the virtual port is enumerated in the COM1 - COM16 range.
The TelLog have to be powered, using its own power supply, to be configured.
Smaller TelLogs integrates the USB to Serial bridge, appearing as an USB device, but the software still consider them serial devices and communicates with them in the same way.
USB TelLogs are powered by the USB port, so they don't require the PSU while connected to a PC.
Launch the configuration software, you will see the “Parameters” tab.
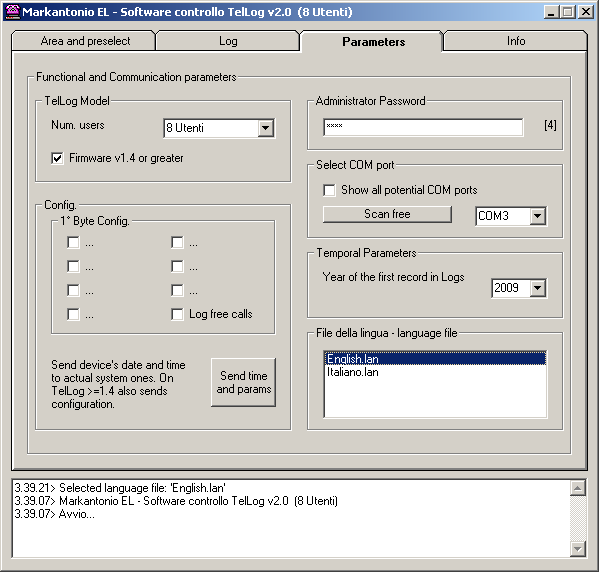
Here is possible to choose the serial port (physical or emulated) the TelLog is connected to.
The program will scan for available serial ports enabling you to chose the right one in the drop list.
If the right port is not listed, enable the Show all potential COM ports check: this will show all 16 ports.
Select the right TelLog's model (number of supported users) and check the Firmware 1.4 box.
In the configuration byte section you can check or un-check 8 marks, but only the last is used at present, the Log Free Calls ones. If checked the TelLog will store a record for calls made via the Free list without authentication.
This details are rarely useful, because you'll not know who made that calls, so you may prefer to save memory not storing this kind of data.
You will need to insert the Administrator's password, which is needed to communicate with the TelLog (for safety and privacy reasons). The TelLog will not answer to the commands sent with a wrong password.
Select the language file you prefer. In the program folder there is an utility to create your own language file.
You have to specify the years the first record on the TelLog memory refers to: if you are in March, but the TelLog is logging data from November of the past year, please insert the past year.
This is because the TelLog doesn't store the year, to maximize memory usage: the software will recalculate it using the months information from the TelLog.
The Send Date and Time button will update the TelLog's internal real time clock, used to add time information to each call's record while logging them, with the PC's ones. It will send the configuration byte too.
It's recommended to update the TelLog's clock each time you connect it to the PC, after updating your PC's ones.
The soft will restart with the same settings on serial port and language next time you use it.
Opening the “Prefixes and preselection” tab there is a table used to insert and modify the relative lists for each user, the Public list and the Free list.
All the lists can be saved in an unique file, so it is possible to have more configurations in more files.
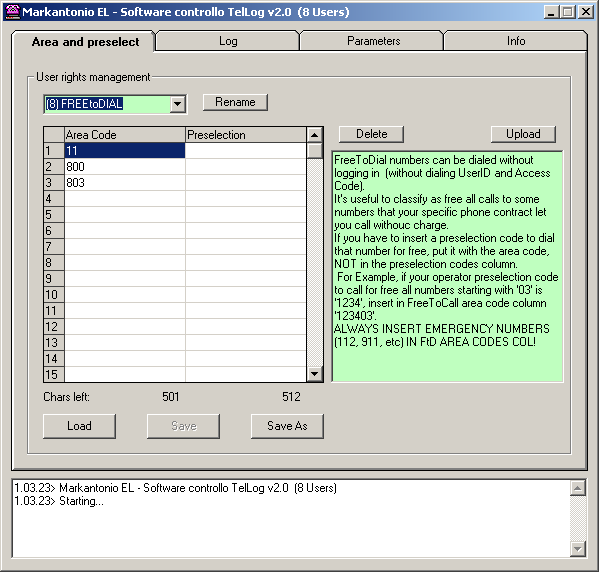
Select the user you want to manage the list (or select Everyone or Free). Everyone is the Public list, and it is the first (dummy user 0 list); the Free list is the last.
It is useful, after you select an user, to rename it. The new name will be saved in the lists file.
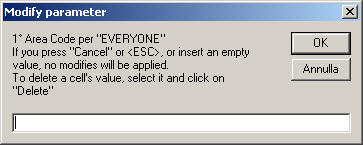
To insert/modify a prefix or a preselection code, select the desired user and then double click on the desired cell or to the first blank cell. This will open a pop-up window to insert/modify the data.
Under the grid there are two counters showing the number of digits you can insert in each column of the table.
To delete an entry simply select it and click on “Delete” button.
While you select an user you will see a brief description about its functions and settings, by user's type.
You can't insert in the Free List a prefix or a preselection code starting with “#”, because this is the authentication procedure starting digit.
You can save all the lists in a whole file by clicking on “Save” or “Save As”. Then you can restore a configuration using the “Load” button.
There are some standard configuration files with the software, that can be the base for custom settings.
By clicking on the “Send” button all the lists will be sent to the TelLog in few seconds (only if you typed the right administrator's password in the Parameters tab).
|
ATTENTION!
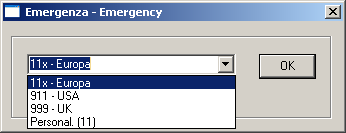
For security reason, to make it always possible to call emergency services, the first prefix in the Free list is considered an emergency number! Chose the correct one (11x, 911, etc) from the drop list or manually insert the local one. Everyone will be able to call numbers starting with that code without authentication.
|
To download the Log list on your PC go to the “Log” tab and click on “Download”
The program will prompt where to store the Logs: choose the desired folder and assign a name for the new file.
Two separate files (having the same name and two different extensions) will be generated: a “.txt” text file, containing the decoded calls log, and a “.bin” binary file containing raw data from the TelLog, for other soft purposes.
The Log download can take up to 30", depending on the numbers of records stored in the TelLog.
When the download is finished you will see the records list and you will have the two aforementioned files.
The most useful file is the “.txt”.
It is suggested to empty the TelLog's memory to restore its original capacity by clicking on “Empty”.
As you can simply manage and print the text file, it could be very useful to elaborate the records using a spreadsheet, so you can calculate totals, manage and apply your own criteria and formulas.
For example (but note that this is a non restrictive example!) consider to import on Excel.
Launch Excel and click on File > Open, then select the “.txt” file you just generated with the TelLog's software.
Select the “Delimited” checkbox and press “Next”;
Select the “Tabbed” checkbox and press “Next”;
Select the last column, containing the called numbers, select the “Text” checkbox and press “End”.
Similar steps can be used on OpenOffice's Calc spreadsheet too.
Using your knowledge on spreadsheets you'll be able to manage the acquired records as you wish, to elaborate statistics, individual costs per user or to discover unwanted uses of the telephone line.
Instructions
and characteristics for TelLog
– Marcantonio
El – www.markantonio.com/TelLog
page